PulseLocker – User Guide
PulseLocker creates immutable, single-use vaults for PLS, pDAI, and HEX.
Each vault unlocks only when:
– Your target USD price is reached
– Your backup time arrives
Everything is fully on-chain, verified, and keyless — no admin, no pausing, and no one (not even the creator) can modify or access your vault.
0) Connect Your Wallet
To begin, connect your Web3 wallet to PulseLocker using your browser’s
wallet extension (such as MetaMask or OKX).
This allows the app to read your address and display any vaults you have created.
PulseLocker never takes custody of your keys, cannot move your funds,
and cannot change or access your vaults. Connecting your wallet simply
enables the app to interact with the smart contracts on your behalf.
1) Choose Asset Type
Start by selecting which token you want to lock:
Each asset has its own PulseX primary and backup price feeds, chosen automatically by USD-normalized liquidity.
2) Set Your Target USD Price
Enter the price (in USD) that must be reached for the vault to unlock via the price condition.
Example: 0.0045 means “unlock when 1 HEX ≥ $0.0045”.
3) Set a Time Unlock (Backup)
Choose a date and time in the future.
This ensures the vault always unlocks eventually even if price conditions fail or feeds are unavailable.
We use two feeds for redundancy: if one pool has low liquidity or stale data, the vault can fall back to the other.
When checking price, the vault automatically picks whichever feed has the larger USD-side liquidity, since that pool gives the most reliable price at that moment.
4) Create the Vault
Connect your PulseChain wallet and click Create Vault.
This deploys a brand-new immutable vault contract that only you own.
5) Deposit Tokens
After creation, simply send PLS / pDAI / HEX to the vault address whenever you want.
There is no deadline — deposit at your leisure.
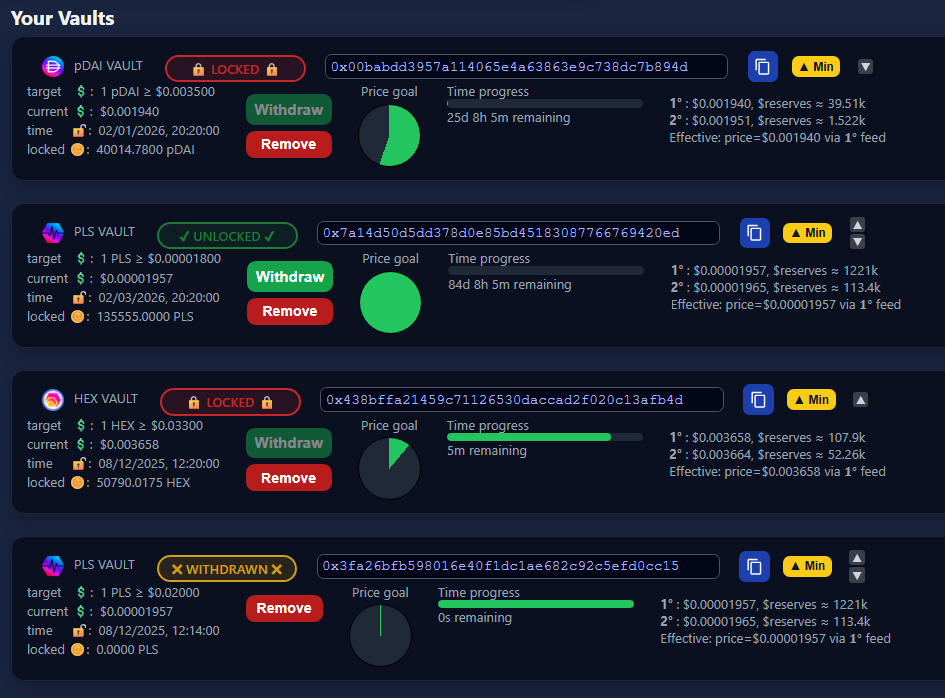
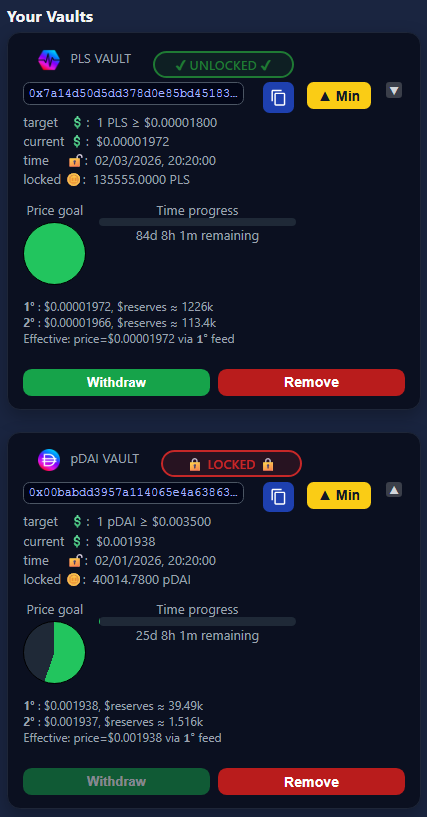
6) Unlock Conditions
Your vault becomes withdrawable when:
- The target USD price is met, OR
- The time unlock is reached
7) Withdrawing
Once unlocked, click Withdraw.
A 0.5% fee is taken automatically (on successful withdrawals only).
After withdrawal, the vault will never lock tokens again.
Other Things to Know
The following sections explain vault behaviour after withdrawal and how to manage vaults
in the dashboard.
Accidentally Sent More Funds?
After withdrawal, the vault is considered “finished”.
If you later send tokens (PLS/PDAI/HEX) to it by mistake, they will not be price-locked.
The UI will show a Rescue button, allowing you to retrieve them immediately.
If any other PRC20 tokens are accidentally sent to a vault, they too may be rescued via clicking
'deep rescue' in the 'about this app' section of the dashboard.
Single-Use Design
Each vault is intentionally a single-cycle discipline vault:
- Create vault
- Deposit tokens
- Unlock via time or price
- Withdraw once
- Vault becomes inactive (rescue only)
Managing Your Vaults
- Remove a vault – Click Remove to hide it from your UI (vault remains on-chain).
- Restore all vaults – Click Restore All Vaults to reload every vault created by the connected address.
- Re-add a vault – Paste any vault address into Add Vault Address Manually.
- View-only vaults – You may view and deposit into vaults you don't own, but cannot withdraw.
- Reorder vaults – Use the ▲ / ▼ arrows.
- Minimize / maximize – Collapse or expand a vault using the Min / Max button.
- Import Vaults from another wallet – Vaults display, but no withdraw function, and marked: View Only
Example Vaults